前提と注意事項
この記事では以下を前提としています。
- Ubuntu22.04
この記事ではCoder 社が開発しているオープンソースのcode-serverについての記事になります。
VSCode をブラウザ上で動作させることができるソフトウェアとしては、Microsoft 公式のVisual Studio Code Serverもあります。
この記事ではこれらの違いなどについては触れません。以下にそれぞれのリンクを記載します。
Visual Studio Code Server
The Visual Studio Code Server is a service you can run on a remote development machine, like your desktop PC or a virtual machine (VM).
code.visualstudio.com
この記事のゴール
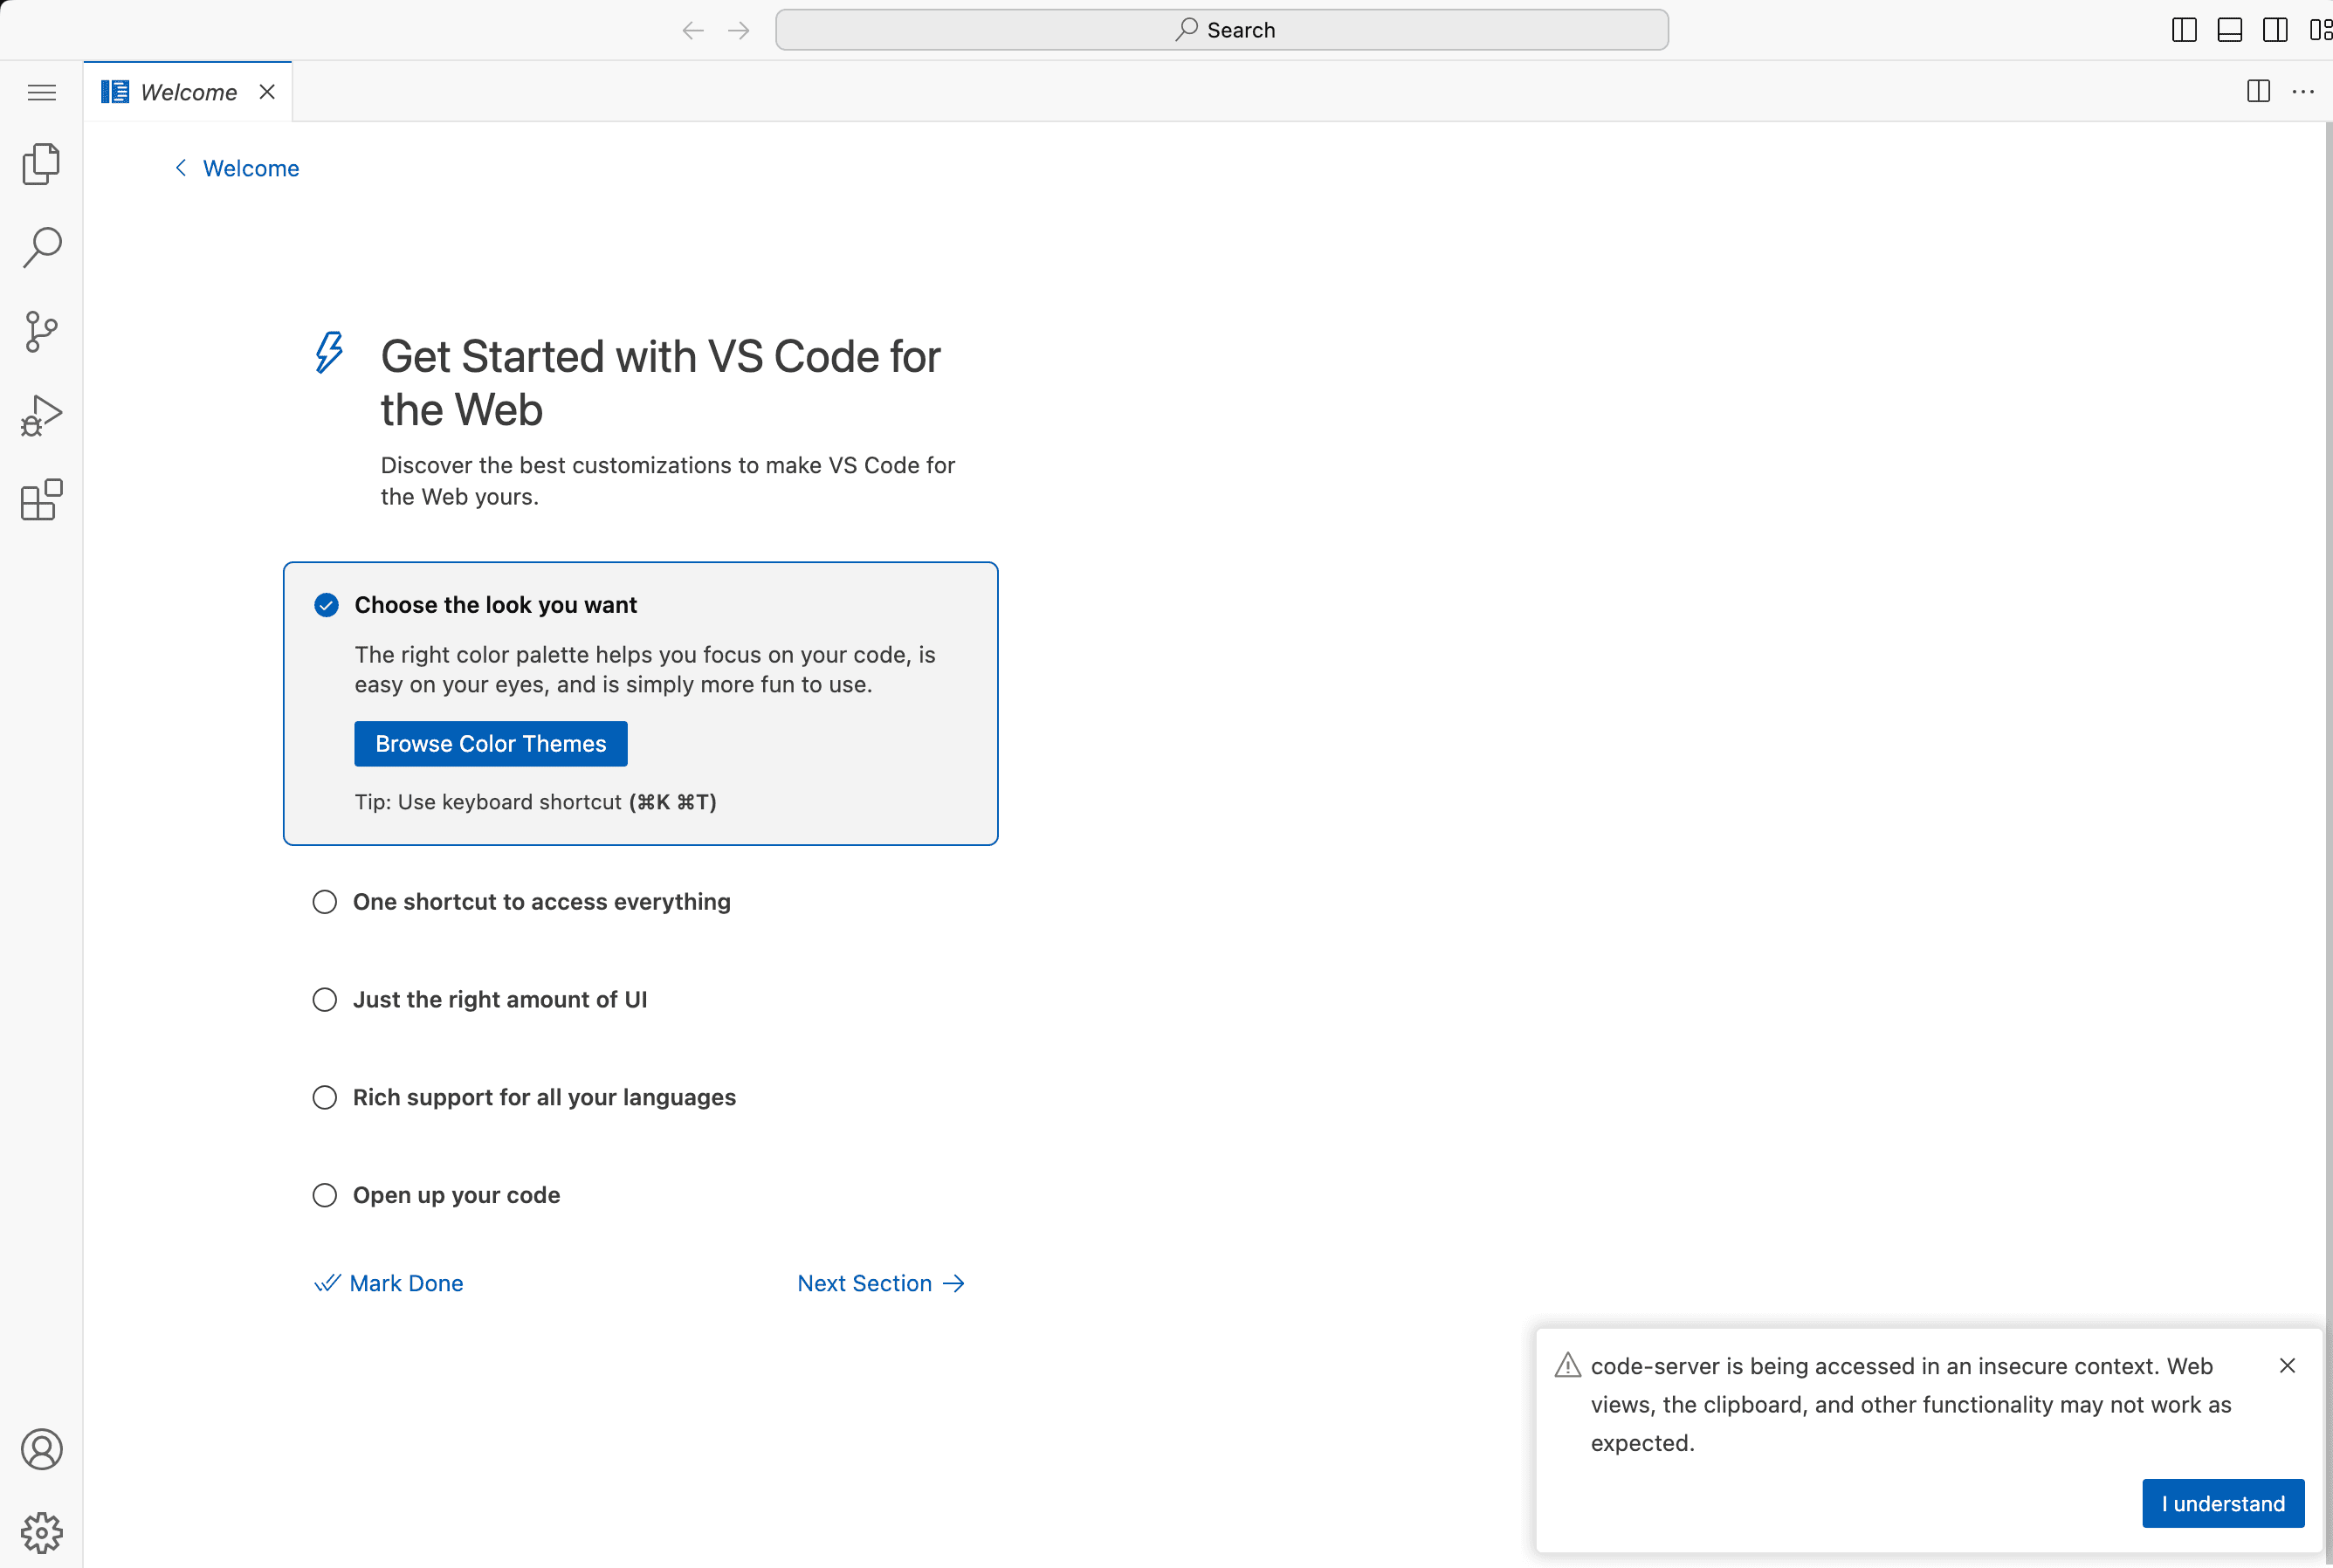
Ubuntu に code-server をインストールし、ブラウザで VSCode を開くところまでをゴールとします。
以下は一見 VSCode アプリを開いている画面に見えますが、ブラウザ内の1つのタブで VSCode を開いています。
code-server をインストールする
公式リポジトリに記載されている手順に従い、以下を実行します。
$ curl -fsSL https://code-server.dev/install.sh | sh実行すると以下のようにインストールが開始されます。
$ curl -fsSL https://code-server.dev/install.sh | sh
Ubuntu 22.04.3 LTS
Installing v4.18.0 of the amd64 deb package from GitHub.

+ mkdir -p ~/.cache/code-server
+ curl -#fL -o ~/.cache/code-server/code-server_4.18.0_amd64.deb.incomplete -C - https://github.com/coder/code-server/releases/download/v4.18.0/code-server_4.18.0_amd64.deb
####                                                      6.3%
インストール開始から数分すると、以下のように使用している ログイン中の Ubuntu ユーザーのパスワード(ログインする時のパスワード)の入力を求められます。
$ curl -fsSL https://code-server.dev/install.sh | sh
Ubuntu 22.04.3 LTS
Installing v4.18.0 of the amd64 deb package from GitHub.

+ mkdir -p ~/.cache/code-server
+ curl -#fL -o ~/.cache/code-server/code-server_4.18.0_amd64.deb.incomplete -C - https://github.com/coder/code-server/releases/download/v4.18.0/code-server_4.18.0_amd64.deb
######################################################################## 100.0%
+ mv ~/.cache/code-server/code-server_4.18.0_amd64.deb.incomplete ~/.cache/code-server/code-server_4.18.0_amd64.deb
+ sudo dpkg -i ~/.cache/code-server/code-server_4.18.0_amd64.deb
[sudo] hisui のパスワード:
パスワードを入力して Enter を押下すると、インストールが続行されて最終的に以下のように表示されます。
$ curl -fsSL https://code-server.dev/install.sh | sh
Ubuntu 22.04.3 LTS
Installing v4.18.0 of the amd64 deb package from GitHub.

+ mkdir -p ~/.cache/code-server
+ curl -#fL -o ~/.cache/code-server/code-server_4.18.0_amd64.deb.incomplete -C - https://github.com/coder/code-server/releases/download/v4.18.0/code-server_4.18.0_amd64.deb
######################################################################## 100.0%
+ mv ~/.cache/code-server/code-server_4.18.0_amd64.deb.incomplete ~/.cache/code-server/code-server_4.18.0_amd64.deb
+ sudo dpkg -i ~/.cache/code-server/code-server_4.18.0_amd64.deb
[sudo] hisui のパスワード:
以前に未選択のパッケージ code-server を選択しています。
(データベースを読み込んでいます ... 現在 218380 個のファイルとディレクトリがイン
  トールされています。)
.../code-server_4.18.0_amd64.deb を展開する準備をしています ...
code-server (4.18.0) を展開しています...
code-server (4.18.0) を設定しています ...

deb package has been installed.

To have systemd start code-server now and restart on boot:
  sudo systemctl enable --now code-server@$USER
Or, if you don’t want/need a background service you can run:
  code-server

Deploy code-server for your team with Coder: https://github.com/coder/code上記の最後の方に、code-serverの起動と Ubuntu 起動時にcode-serverを起動するためのコマンドとして以下を実行するよう書かれているので指示通りに実行します。
$ sudo systemctl enable --now code-server@$USER以下が実行結果です。
$ sudo systemctl enable --now code-server@$USER
Created symlink /etc/systemd/system/default.target.wants/code-server@hisui.service → /lib/systemd/system/code-server@.service.
以上でインストールと起動が完了です。上記を実行することで Ubuntu が起動する時にcode-serverも起動します。
このままだとローカルホストからのみアクセスできる状態になっているため、別の端末からアクセスできるように設定を変更します。
ローカルホスト以外のアクセスを許可する
code-serverの設定ファイルは、インストール時に~/.config/code-server/config.yamlに作成されます。
デフォルトだと内容は以下のようになっています。
bind-addr: 127.0.0.1:8080
auth: password
password: ded1ca806680a94c103eb2c8
cert: falseローカルホスト以外の端末からのアクセスを許可するために以下のようにbind-addrを変更します。
# bind-addr: 127.0.0.1:8080
bind-addr: 0.0.0.0:8080
auth: password
password: ded1ca806680a94c103eb2c8
cert: false
これでローカルホスト以外からの端末からもアクセスが可能になります。
なお、後ほど上記に表示されているpasswordを使用します。
設定を変更したら以下でcode-serverを再起動します。
$ sudo systemctl restart code-server@$USER動作確認
これでローカルホスト以外からの端末でブラウザを開いて172.28.0.123:8080にアクセスしてみると、以下のようにパスワード入力画面が表示されます。
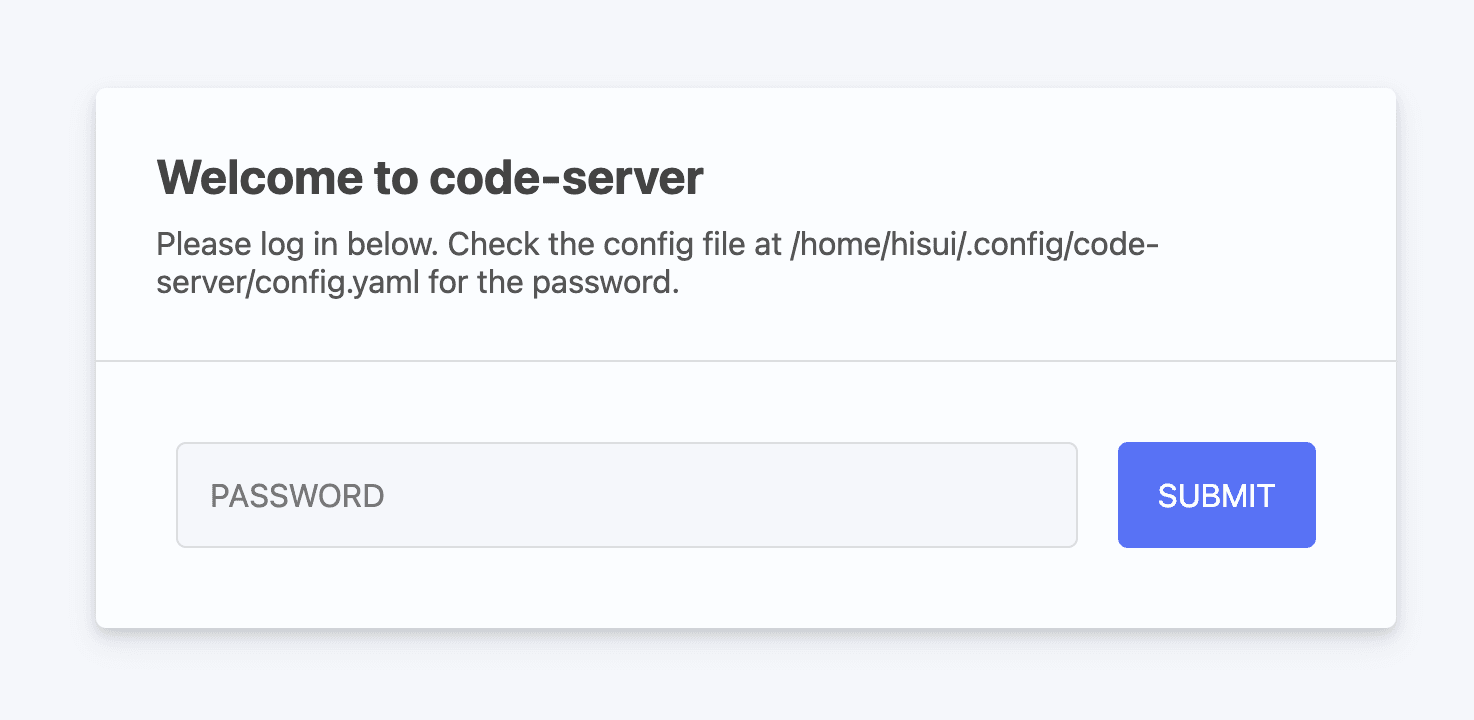
config.yamlに記載してあったパスワード(~/.config/code-server/config.yamlの中のpasswordの値であるded1ca806680a94c103eb2c8が該当)を入力してSUBMITをクリックすると、以下のように表示されます。
これで無事に code-server をインストールできました。
パスワードの変更方法
パスワードを変更するには、config.yamlにあるpasswordを編集して新しい値にすれば OK です。
まとめ
自宅や会社にあるスペックの高いデスクトップ PC にcode-serverをインストールし、ノート PC やタブレットのブラウザからアクセスすることで、ノート PC やタブレットのスペックを気にせずに VSCode を使用できます。
また開発環境を別途構築する必要もなくなります。
特にバッテリーの消費が高い作業をする場合は、手元のノート PC やタブレットのバッテリーを気にせずに作業できるので便利です。